Advances in DIY Dance Pad Technology
I spent a lot of time modding my dance pad, so I decided to write about it. Maybe it can help other people that want to mod their own pad.
This blog posts contains the whole history of my dance pad setup. If you just want to know about my current setup scroll down to the FSR section.
The Beginnings
Like many people I started playing StepMania on a soft pad, but grew out of it quite quickly. The buttons are not very sensitive and bracketing is almost impossible to do on it.
Aditionally it was slipping on the floor when playing faster stuff, so I often ended up at a right angle to the screen after a long song. Not ideal.
I'm not complaining – it was cheap. Definitely a worthwile investment to find out that I absolutely love the game.
L-TEK Dance Pad
After a few months I was looking for something better and I found the L-TEK dance pads. According to reviews on the internet they are much better than soft pads, they are affordable and they don't cost a fortune to ship to Austria. I was sold. I had to get used to the hard pad, but it was a big improvement.
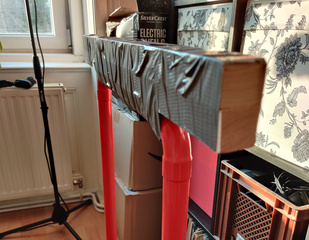
Later on L-TEK also started selling bars, which I bought and I'm still using. It's a bit too low, so I taped some wood on top of it.
No, the edges are not comfortable, but it's not too bad with a towel over it. I'm also wearing gym gloves when playing.
Penny Mod
Shortly after I got my new pad I got into ITG stamina play, so I wanted all the pad sensitivity I can get, and above all I wanted to minimize my form by making as small steps as possible.
The L-TEK pad has a big sensor under each arrow panel. It's basically just two metal plates that trigger the arrow when they make contact. Because the sensor is in the middle, the arrow doesn't trigger when stepping on the edge of the panel. Kinda bad if that's the exact area you optimally want to hit for good form.
One way to get better sensitivity is to add pennies between the sensor plates to reduce travel between them. Someone else made a detailed guide for it, have a look at it if you are interested. The only thing I did differently is to use washers instead of coins, because all the Euro/cent coins I had at home were too thick and caused the sensors to permanently stay on.
If you own an L-TEK pad I highly recommend doing the penny mod. It's low effort and it yields substantial gains in sensitivity. Unfortunately it's a bit of a tradeoff between sensitivity and consistency, so you'll have to tweak it a couple of times to get a sensitive setup where the arrows don't get stuck.
The Polling Rate
The USB controller built into the pad requests a polling interval of 10ms. Given that the standard ITG timing window for "Fantastic" is only 21ms, this makes it very hard to reliably get good scores. Not good.
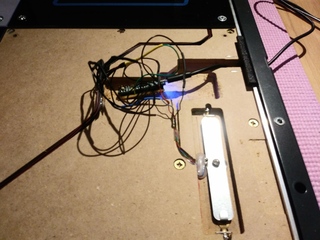
After some emails back and forth with the makers of the pad I decided to just replace the controller with an Arduino to work around the polling issues.
It worked fine.
Force Sensitive Resistors
Somewhere around that time I joined the Stamina Nation Discord. People were talking about force sensitive resistors (FSRs). They don't just give an on/off reading, but provide an analog value that tells you how much pressure was applied. That comes in handy when you want to control how sensitive your pad should be.
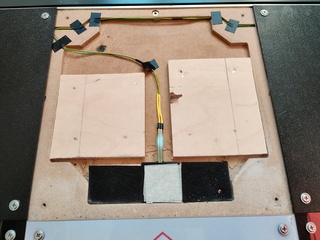
I decided to give it a go. After removing the original sensors from the cavities under the panels, I filled them up with wood and added in the FSRs.
The FSR is covered by a layer of felt with some masking tape stacked on it to control the height. The FSR has to be the highest point under the panel, so that the pressure applied to the panel reaches it. Filling up the hole was necessary to reduce flex of the panel, which negatively impacts sensitivity and timing.
Here is a nice tutorial that you can follow for FSR modding your dance pad. One thing that I did differently is that I used 10kΩ resistors instead of 330Ω, because that's what the manufacturer of the particular sensors that I use recommends. Your mileage may vary.
Touchscreen UI
As a final touch (pun intended) I spent another weekend adding a touchscreen to the Arduino. Good thing there is an Arduino compatible touchscreen shield. I just had to solder some wires to it to connect the FSRs to the right pins (A0-A3, GND and 5V) and it was good to go. It also needed some jumpers soldered to make it compatible with the Arduino Leonardo that I used. Programming the thing was surprisingly straight-forward.
I think the most complicated thing I had to do was to debounce the touchscreen input to avoid multiple clicks for one touch. I chose a simple delay and repeat algorithm, so that you can keep the button pressed to adjust the threshold by multiple steps.
There are two threshold values that can be configured for each sensor. The activate threshold (green) determines when the sensor switches to the "on" state, the deactivate threshold (red) determines when the sensor switches to the "off" state. The UI also displays the current value of the sensor reading (white). I'm not using the same value for both thresholds to avoid sporadic triggers.
Sensor readings are not linear: the higher the pressure becomes, the less the reading will change. To compensate for this in the UI I square the values before displaying them. It makes the output more readable.
Threshold values are stored on the EEPROM, so they survive a restart. The touchscreen shield also contains a microSD slot that I could have used for storing data, but I thought that's probably overcomplicating things if all I need is 16 bytes of storage. ;)
One downside is that you have to go back to the main screen when playing to eliminate lag caused by display updates, but I can live with that.
If you are interested in the code, You can find it on my GitLab page.
Mod your own pad!
If you want to replicate my setup, here is the stuff you will need:
- 1x L-TEK dance pad with handbar. Maybe consider building your own handbar, but I don't have any experience with that. By now the only thing I use of the L-TEK pad is the base and the panels, all the electronics are custom. If you are good at woodworking, you can build the base yourself and just order some panels.
- 1x Arduino Leonardo or any other compatible board
- 4x Square FSR
- 4x 10kΩ resistor
- wood
- a soldering iron, wires, a steady hand and some patience
I won't claim that this is the best modded dance pad you can get, but it works well for me.
I hang out on the Stamina Nation Discord. Feel free to contact me there if you are interested in ITG and plan on FSR modding your own pad.


